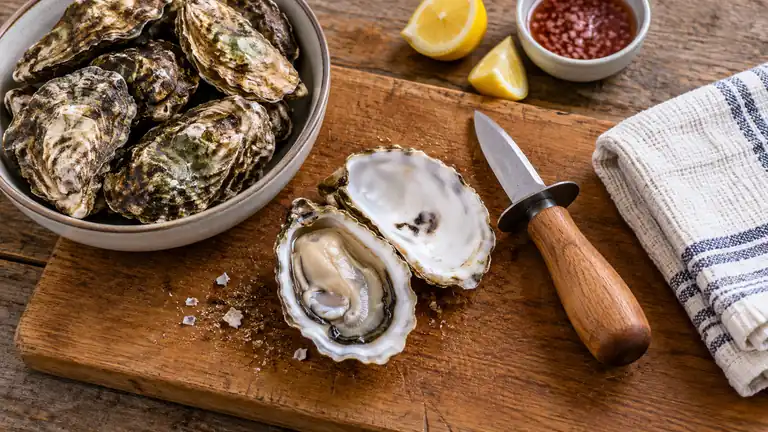
To shuck an oyster, place it cupped-side down on a stable, towel-covered surface, insert an oyster knife into the hinge, and twist the blade until the shells separate. Slide the knife under the top shell to cut the adductor muscle, remove the top shell, then release the oyster from the bottom shell. Keep the blade pointed away from your hand and preserve the liquid inside the shell.
Use a purpose-built oyster knife rather than a chef’s knife, paring knife, or other pointed kitchen blade. An oyster knife has a short, sturdy blade that can tolerate controlled twisting. Ordinary kitchen knives are more likely to bend, break, or slip during the task.
Use a tool made for shucking rather than a pointed kitchen knife. These oyster knives with different blade and handle designs help you compare the relevant features before following the method below.
Tools and Supplies
- Oyster knife: Choose a sturdy knife with a comfortable, slip-resistant handle and a blade guard or flared handle where possible.
- Thick folded kitchen towel: This stabilizes the oyster and protects the holding hand. A cut-resistant glove can provide additional protection, but it is not cut-proof.
- Stiff brush: Use it to remove mud and loose debris from the shells.
- Rimmed tray or cutting board: A rim helps contain spilled oyster liquor and shell debris.
- Bowl for discarded shells: Keeping waste separate reduces clutter around the work area.
- Ice: Use crushed ice to keep opened oysters cold before serving.
A cut-resistant kitchen glove can add protection when appropriate, but it is not cut-proof or a guarantee against a puncture. Tool control and hand position still matter.
How to Shuck Oysters Step by Step
-
Keep the oysters cold. Refrigerate live oysters at 40°F or below until you are ready to open them. Do not leave them sitting in standing water or sealed in an airtight container. Place opened oysters over ice if they will not be served immediately, while keeping them out of melting ice water.
-
Check each shell. Discard oysters with badly cracked shells. If an oyster is open, tap the shell. A live oyster should close or show movement. Discard one that remains open and unresponsive.
-
Clean the exterior. Scrub the shell under cold running water to remove mud, sand, and loose shell particles. Avoid soaking oysters in fresh water.
-
Prepare a stable work surface. Place a folded towel on a cutting board or rimmed tray. Set the oyster cupped-side down so its natural liquid remains in the deeper bottom shell. The flatter shell should face up.
-
Cover and secure the oyster. Fold part of the towel over the shell and hold it firmly with your non-dominant hand. Leave the hinge exposed. Keep your fingers behind the knife’s working direction rather than near the hinge.
-
Insert the oyster knife into the hinge. Place the tip in the small gap where the two shells meet. Apply steady, controlled pressure with a slight rocking motion. Do not stab forcefully or drive the blade toward your holding hand.
-
Twist to open the hinge. Once the tip has entered a short distance, rotate the handle as though turning a key. The goal is to separate the shells through leverage rather than pry them apart with a large bending motion. A small pop usually signals that the hinge has released.
-
Cut the upper adductor muscle. Keep the knife nearly flat against the inside of the top shell. Slide it toward the adductor muscle, which holds the two shells together, and cut through the attachment. Staying close to the shell reduces the chance of slicing into the oyster meat.
-
Remove the top shell. Lift it away carefully. Check the oyster for loose shell fragments, mud, or other debris. Remove shell pieces with the knife tip or clean fingers. Avoid rinsing the opened oyster because rinsing washes away its natural liquor and can affect its texture.
-
Release the oyster from the bottom shell. Slide the blade beneath the meat and cut the lower adductor attachment while keeping the oyster in the cupped shell. Turn the oyster over if desired for a neater presentation.
-
Serve or chill promptly. Place the finished oyster level on crushed ice so the shell does not tip and spill its liquor. Continue shucking in small batches to keep the remaining oysters cold.
Why an Oyster Knife Is Safer Than a Kitchen Knife
An oyster shell requires leverage at a narrow, irregular hinge. A conventional kitchen knife is built primarily for controlled slicing or chopping, not twisting against a hard shell. A thin paring knife can flex or snap, while the pointed tip of a chef’s knife can skid across the shell.
A clam knife may use a different opening profile. Do not infer that a clam-opening tool is suitable for the oyster hinge method described here.
Most oyster knives have a short, rigid blade and a handle shaped for a firm grip. The blade does not need the fine cutting edge expected from a chef’s knife. It needs enough strength for hinge work and enough edge near the blade to sever the adductor muscle.
Do not substitute a screwdriver. It may open the hinge, but it is poorly shaped for cutting the muscle and can introduce grease, rust, or other contaminants unless it is a food-safe tool kept specifically for kitchen use.
How to Position the Knife Safely
The exact angle varies with the oyster’s shape, but the central safety rule remains constant: the knife’s path should lead away from the holding hand, wrist, and torso. Work on the counter rather than holding an unprotected oyster in your palm.
- Keep the oyster cupped-side down.
- Expose only the hinge while covering the rest with a folded towel.
- Grip the handle firmly without wrapping a finger along the blade.
- Use gradual pressure and small movements.
- Twist the blade after it has entered the hinge rather than forcing it straight forward.
- Stop and reposition the oyster if the knife begins to slip.
A cut-resistant glove can add protection for the holding hand. Its level of resistance depends on its material and construction, so it should never be treated as permission to direct the knife toward the hand.
What to Do If the Hinge Will Not Open
Some oysters have tight, brittle, or heavily encrusted hinges. Wipe the hinge clean and look for the line where the two shells meet. Adjust the tip a few millimeters and try a gentle rocking movement. Excessive force is more likely to break the shell or cause the knife to slip.
If part of the hinge breaks away, look for a small opening along the side near the pointed end. Carefully work the oyster knife between the shells and keep its path away from your hand. Once the shells separate slightly, slide the blade against the top shell and cut the adductor muscle as usual.
Discard an oyster if the shell is extensively damaged, the interior is contaminated with mud that cannot be removed without rinsing the meat, or the oyster has an abnormal odor.
Keeping Shell Fragments Out of the Oyster
Shell fragments often enter the cup when the knife is forced through a brittle hinge or dragged through broken shell. Clean the exterior first, apply controlled pressure, and wipe the blade between oysters. After opening each shell, inspect the liquor under good lighting.
Remove visible fragments individually. Pouring out the oyster liquor or rinsing the meat removes flavor and does not guarantee that every fragment is gone. If the cup contains extensive shell debris, transferring the oyster to a clean shell is safer than serving it among sharp fragments.
Raw Oyster Food Safety
Raw oysters can carry harmful microorganisms, including Vibrio bacteria. Contaminated oysters may look, smell, and taste normal. Lemon juice, alcohol, and hot sauce do not make raw oysters safe.
People who are pregnant, older, very young, immunocompromised, or living with certain health conditions face greater risk from raw or undercooked shellfish. Proper cooking is the safer choice for anyone in a higher-risk group or anyone uncertain about eating raw shellfish.
- Buy oysters from a reputable source and keep any harvest identification information supplied with them.
- Maintain refrigeration before and after shucking.
- Wash your hands before handling oysters and after touching the exterior shells.
- Keep raw shellfish and their liquid away from ready-to-eat foods.
- Clean and sanitize the knife, brush, towels, work surface, and tray after use.
- Discard oysters with persistent off odors, damaged shells, or signs that they were dead before shucking.
Cooking guidance varies by preparation method and local food-safety authority. Follow applicable official guidance rather than judging doneness from shell opening alone.
Cleaning the Oyster Knife After Use
Shellfish residue and salt can remain around the blade and handle. Wash the oyster knife promptly with warm water and dish soap, paying attention to the junction between the blade and handle. Rinse it and dry it thoroughly before storage.
After cleaning, keep the opener dry and protected from accidental contact. The broader knife-storage guidance explains why loose placement among utensils is a poor default.
Dishwasher suitability depends on the knife’s materials and manufacturer instructions. Hand washing generally provides better control around the short blade and avoids prolonged exposure to moisture and harsh dishwasher conditions. Store the knife where its tip cannot injure someone reaching into a drawer.
Frequently Asked Questions
Which Side of an Oyster Faces Up While Shucking?
Place the flatter shell on top and the deeper, cupped shell on the bottom. This position helps retain the oyster and its natural liquor after the upper shell is removed.
Should You Rinse an Oyster After Opening It?
Usually, no. Rinsing removes the flavorful liquid inside the shell. Scrub the exterior before opening, then pick out isolated shell fragments. An oyster heavily contaminated during opening should be discarded or handled according to the severity of the contamination.
Can You Shuck Oysters in Advance?
They are best opened close to serving time. If a brief delay is necessary, keep shucked oysters cold, level, and protected from contamination. Do not allow them to sit in melted ice water.
Does an Oyster Knife Need to Be Razor-Sharp?
No. Hinge opening depends on a strong tip and controlled leverage rather than a razor edge. The blade still needs a serviceable edge for cutting the adductor muscle. A damaged, severely dull, bent, or loose blade should not be used.
Why Does the Oyster Smell Unpleasant After Opening?
A fresh oyster may smell mildly briny, like clean seawater. A strong sour, rotten, or otherwise abnormal odor is a reason to discard it. Do not taste a questionable oyster to determine whether it is safe.
Successful shucking relies on a stable surface, a sturdy oyster knife, controlled twisting pressure, and careful temperature management. Keep the cupped shell down, protect the holding hand, preserve the oyster liquor, and inspect each serving for shell fragments before it reaches the table.
