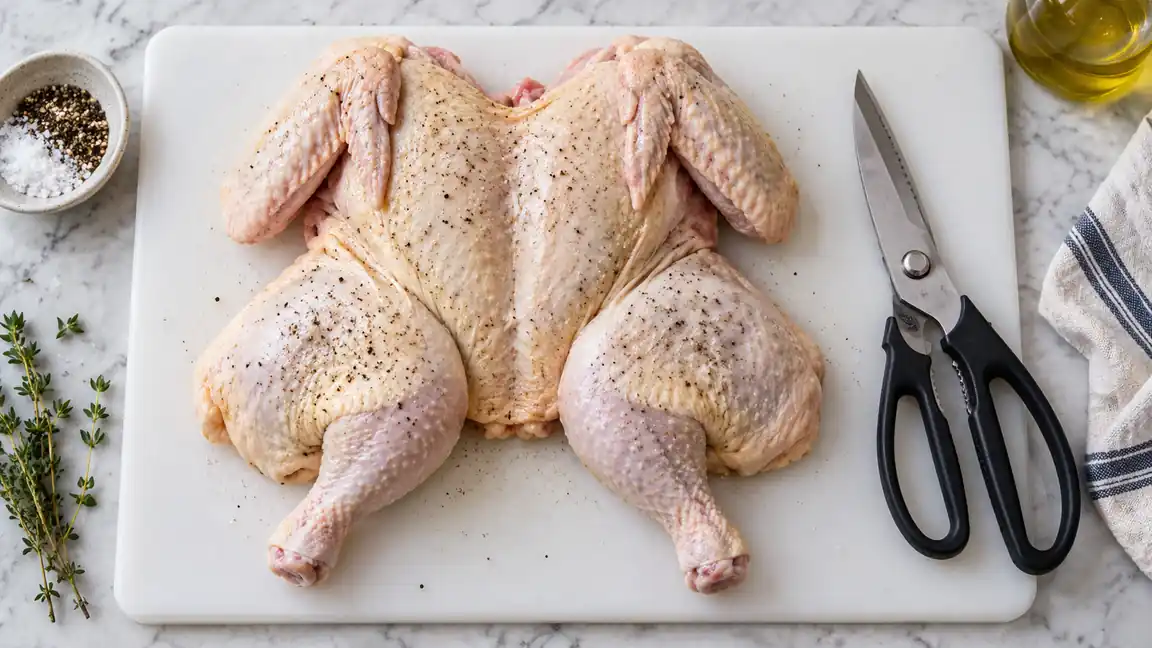
To spatchcock a chicken, remove the backbone with poultry shears, open the bird, turn it breast-side up, and press firmly on the breastbone until the chicken lies flat. This shape exposes more skin to direct heat and helps the breast and legs cook more evenly than they often do on an intact bird.
Poultry shears are the safest and most practical cutting tool for this task. A boning knife can help trim skin or cartilage, but an ordinary chef’s knife should not be forced through the backbone or ribs. Contact with bone can chip a thin or delicate edge, and a slippery raw chicken makes heavy knife work difficult to control.
Check that the tool is intended for poultry before cutting alongside the backbone. The poultry-shears comparison focuses on relevant designs, while the steps below explain the controlled cutting path.
Tools and Preparation
- A fully thawed whole chicken
- Sturdy poultry shears
- A large, stable cutting board
- Paper towels
- A rimmed tray or roasting pan
- An instant-read food thermometer
- A small boning or utility knife for optional trimming
Use a cutting board large enough to contain the chicken and its juices. Place a damp kitchen towel or nonslip mat beneath the board if it moves on the counter. Keep other ingredients, utensils, and clean dishes away from the raw poultry work area.
Remove the chicken from its packaging and take out the giblets or neck if they are stored inside the cavity. Do not rinse the chicken. Rinsing can splash bacteria onto nearby counters, utensils, and food. Pat the exterior and cavity dry with paper towels instead.
Check the cavity for ice before cutting. A partially frozen backbone is harder to cut and may cause the shears to slip. Allow the chicken to thaw safely in the refrigerator before continuing.
How to Spatchcock a Chicken Step by Step
-
Place the chicken breast-side down. Set the bird on the cutting board with the legs facing you. The backbone should be visible as a firm strip running from the tail end to the neck opening.
-
Locate one side of the backbone. Start near the tail and identify the line where the ribs meet the backbone. Cutting close to this line removes less usable meat.
-
Cut from the tail toward the neck. Insert the poultry shears on one side of the backbone and cut through the thin rib bones. Use short, controlled squeezes. Keep your free hand away from the path of the shears.
-
Cut along the other side. Rotate the chicken if that gives you better control, then cut from the tail to the neck along the opposite side. Remove the backbone and set it aside.
-
Check for loose fragments. Open the chicken and look along the cut edges. Remove any small, loose pieces of bone or cartilage with the shears. Do not run your fingers along sharp cut ribs.
-
Turn the chicken breast-side up. Spread the legs outward so the bird rests open on the board.
-
Flatten the breastbone. Place the heel of one hand over the center of the breastbone, with your fingers raised away from the skin. Place your other hand on top and press down firmly. You should feel or hear the breastbone or surrounding cartilage give way.
-
Arrange the chicken for cooking. Transfer it to a rimmed tray or pan, breast-side up. Turn the legs outward and tuck the wing tips behind or beneath the upper breast area so they are less likely to burn.
The finished chicken should have a low, relatively even profile. It does not need to be perfectly flat. Pressing repeatedly with excessive force can tear the skin or damage the meat.
Where to Cut Around the Backbone
The backbone is narrower than the full width of the chicken’s back. Each cut should pass through the rib cage immediately beside the backbone rather than through the heavy vertebrae. Poultry shears usually produce a cleaner, more controlled cut here than a kitchen knife.
Resistance can vary along the cut. The ribs are generally thin, while the areas near the neck and thigh joints may feel firmer. If the shears stop moving, release them, adjust their position, and take a smaller cut. Twisting or forcing the tool can cause it to slip.
Accidentally cutting a little farther into the ribs is usually harmless, though it may leave more exposed bone. Inspect the cut edges carefully before seasoning the chicken.
Should You Use a Knife or Poultry Shears?
| Tool | Appropriate Role | Limitations |
|---|---|---|
| Poultry shears | Cutting through ribs on both sides of the backbone | Must be sturdy, sharp, and thoroughly cleaned after use |
| Boning knife | Trimming skin, fat, and soft connective tissue | Should not be twisted or forced through hard bone |
| Chef’s knife | Limited trimming around the cavity | A thin edge may chip on bone, and heavy cutting is difficult to control |
| Meat cleaver | Bone work when the tool is specifically intended for it | Requires ample space and confident technique; unnecessary for ordinary spatchcocking |
A flexible fillet knife is a poor choice for removing the backbone. Its narrow blade can flex or twist during contact with ribs. A Chinese vegetable cleaver should also stay away from poultry bones unless its manufacturer specifically identifies it as suitable for that work. Its broad shape does not automatically make it a meat cleaver.
A boning knife for chicken may help with appropriate trimming or joint work, but should not be forced through the backbone as a substitute for suitable shears.
Ordinary kitchen shears vary in their intended tasks. Do not assume every pair has the construction or permitted use needed for poultry ribs.
If your shears cannot cut the ribs without extreme pressure, stop and use a more suitable pair. Striking the spine of a chef’s knife, rocking a blade against bone, or making uncontrolled chopping motions creates avoidable injury and blade-damage risks.
Seasoning and Cooking the Flattened Chicken
Once flattened, the chicken can be seasoned with salt, pepper, herbs, spices, or a marinade. For better browning, dry the skin before applying oil or other seasonings. Seasoning beneath loosened breast skin can flavor the meat, but work gently to avoid tearing the skin.
A spatchcocked chicken can be roasted, grilled, or cooked over indirect heat. Place it breast-side up for roasting. On a grill, use a setup that prevents dripping fat from causing persistent flare-ups. Cooking temperature and timing vary with the chicken’s weight, equipment, and heat level, so elapsed time alone cannot confirm doneness.
Check the internal temperature with a food thermometer in the thickest part of the breast and the innermost part of the thigh, without touching bone. Poultry should reach at least 165°F. Check more than one location because different sections may finish at different times.
After cooking, allow the chicken to rest briefly before carving. Resting makes handling easier and gives surface juices time to settle.
Food Safety and Cleanup
Raw chicken can contaminate hands, handles, faucets, and nearby surfaces. Wash your hands with soap and water for at least 20 seconds after handling it. Clean the board, shears, knife, tray edges, and any surface touched by raw poultry or its juices.
Follow the cleaning and disinfection instructions appropriate for the surface and cleaning product. If the poultry shears separate for cleaning, take them apart according to their manufacturer’s directions. Wash around the pivot, where residue can collect, and dry the shears thoroughly before storage.
Do not place cooked chicken back on an unwashed tray that held it raw. Use clean utensils and a clean serving board for carving.
Frequent Problems and Simple Fixes
The Shears Will Not Cut Through the Ribs
Confirm that you are cutting beside the backbone rather than directly through the vertebrae. Reposition the blades and use short squeezes. Dull, loose, or lightweight kitchen scissors may lack the strength and control needed for poultry.
The boning-versus-fillet comparison explains blade flexibility without turning that distinction into permission to cut hard bone.
The Chicken Will Not Lie Flat
Make sure the entire backbone has been removed. Turn the chicken breast-side up, spread the legs, and apply firm pressure directly over the center of the breastbone. A large bird may need more pressure than a small chicken.
The Skin Tears While Flattening
Place the heel of your hand over the breastbone rather than pulling on the skin. Keep fingers raised and apply steady downward pressure. Small skin tears generally affect appearance more than cooking, but exposed meat may brown faster.
One Side Cooks Faster
Uneven heat, an off-center pan position, or irregular bird shape may be responsible. Rotate the pan if your oven has a pronounced hot spot. Use thermometer readings from the breast and both thighs rather than relying on color alone.
What to Do With the Backbone
The removed backbone can be refrigerated or frozen for making poultry stock. It contains bone, connective tissue, and small amounts of meat that add body and flavor during simmering. Keep it chilled promptly and handle it with the same care as other raw chicken parts.
Spatchcocking requires only a few controlled cuts: two alongside the backbone, followed by firm pressure on the breastbone. Stable equipment, poultry shears, careful sanitation, and thermometer-based doneness checks make the process safer and more predictable.
