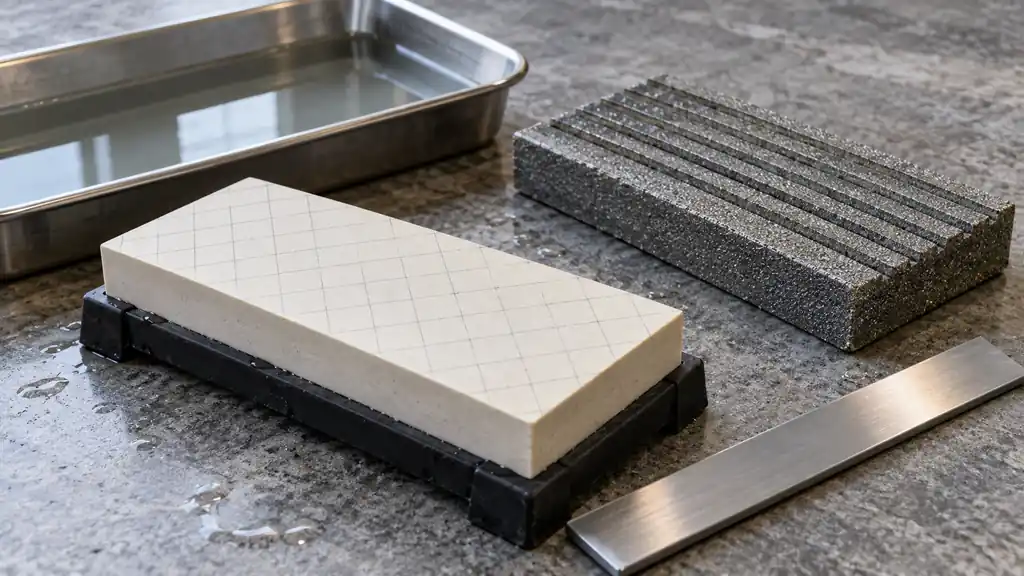
Flatten a whetstone by removing the high areas of its working face against a compatible, genuinely flat abrasive surface. A light pencil grid can help show which areas have made contact, and a suitable straightedge can help check the result. Prepare the stone and flattening tool according to their own instructions; stone type, grit, and binder affect what methods are appropriate.
A worn hollow in a waterstone can interfere with consistent contact. Compare flattening stones for waterstones only after checking compatibility with your stone, then use the surface checks below to guide the work.
Check Whether the Surface Is Actually Dished
A stone can wear more in the area where a blade repeatedly travels. That changes contact across the working surface. Poor cutting alone does not prove that the stone is hollow, however: glazing, contamination, blade angle, and technique can also affect the result.
Clean the face as the maker permits and inspect it. Place an appropriate straightedge across several positions without damaging the stone. A visible gap or rocking contact can suggest an uneven face. Check lengthwise, across the width, and diagonally rather than judging a single line.
A coarse stone and a fine finishing stone may have different preparation and maintenance requirements. Flatten only the intended working face, and preserve any backing or mounting arrangement specified by the manufacturer.
Choose a Compatible Flattening Surface
A flattening stone, a suitable lapping plate, or another maker-approved system can remove the high spots. The surface doing the flattening must itself be sufficiently flat and suitable for the stone. An arbitrary piece of paving material is not an equivalent reference surface.
Norton’s waterstone guidance describes a dedicated flattening stone and an alternative abrasive-paper method. Those examples do not establish that every abrasive paper, support, or soaking procedure suits every waterstone.
Likewise, a diamond sharpening plate is not automatically approved for lapping every grit and stone type. Fine stones, coarse stones, and particular plate designs can have different limitations. Check both manufacturers’ instructions rather than deciding by the word “diamond.”
Prepare a Stable Work Area
Keep the stone, abrasive, water, and residue contained on a stable surface. Use a tray or sink arrangement that will not shift under normal working pressure. Keep knives out of the maintenance area while the stone is being flattened.
If a separate support is needed, compare whetstone holders that stabilize the workpiece by their size and clamping arrangement. A holder must not block the contact needed for the chosen lapping method; in some methods the stone moves over a fixed plate instead.
Follow the specified water preparation. Some stones need soaking, others do not require routine soaking, and permanently immersing an unsuitable stone can create problems. Shapton’s FAQ illustrates why a brand’s own preparation instructions matter. Do not substitute another stone’s waiting time.
Mark, Flatten, and Inspect
- Prepare both surfaces. Follow the approved wetting, cleaning, and support procedure for the actual materials.
- Draw a light grid if permitted. Cover the working face with spaced pencil lines. The marks are a contact guide, not a reason to abrade a printed or coated face that is not intended for lapping.
- Establish controlled contact. Keep the surfaces aligned and use the manufacturer’s movement pattern. Avoid pressing only on one corner.
- Inspect frequently. Rinse or clear slurry as directed so contact and remaining marks can be evaluated.
- Recheck the whole face. Look for uneven remaining marks and use the straightedge appropriately. Consider both observations rather than assuming a few erased lines prove the whole surface is flat.
- Finish the edges only if instructed. Some systems call for a light edge treatment after flattening. Do not improvise a large chamfer or alter a supported stone’s construction.
- Clean and dry as directed. Remove loose abrasive and slurry before the stone returns to knife sharpening or storage.
Shapton’s KUBO instructions demonstrate grid marking and specify restrictions for that plate. They are an example of a defined system, not a universal procedure for all stones or all diamond surfaces.
Troubleshoot Uneven Results
- Only the ends lose their marks. Recheck whether the middle is low, the reference surface is flat, and the contact pressure is balanced.
- One corner wears faster. Examine support and hand pressure before continuing. More force on the same corner can deepen the error.
- The process seems unusually slow. Confirm compatibility and clean the abrasive as instructed. A worn or loaded flattening surface may not cut as expected.
- The face scratches unexpectedly. Stop and check for coarse contamination or a mismatched abrasive. Clean equipment between different stone grits.
If a stone is cracked, separating from its backing, or worn beyond a usable condition, flattening may not be the appropriate remedy. The waterstone comparison can help assess replacement formats when replacement is actually needed; a modest hollow is not by itself a reason to discard a serviceable stone.
Maintain the Surface as Part of the Sharpening Routine
There is no universal calendar interval for flattening. Wear depends on the stone, blade geometry, working area, pressure, and how often the system is used. Inspect the face when changing tasks and when contact no longer feels consistent, rather than waiting for a large hollow.
Once the stone is clean and ready, return to the blade’s actual maintenance procedure. Sharpening Japanese knives by their edge geometry addresses that next stage; maintaining a flat stone does not determine the correct angle or technique for every knife.
