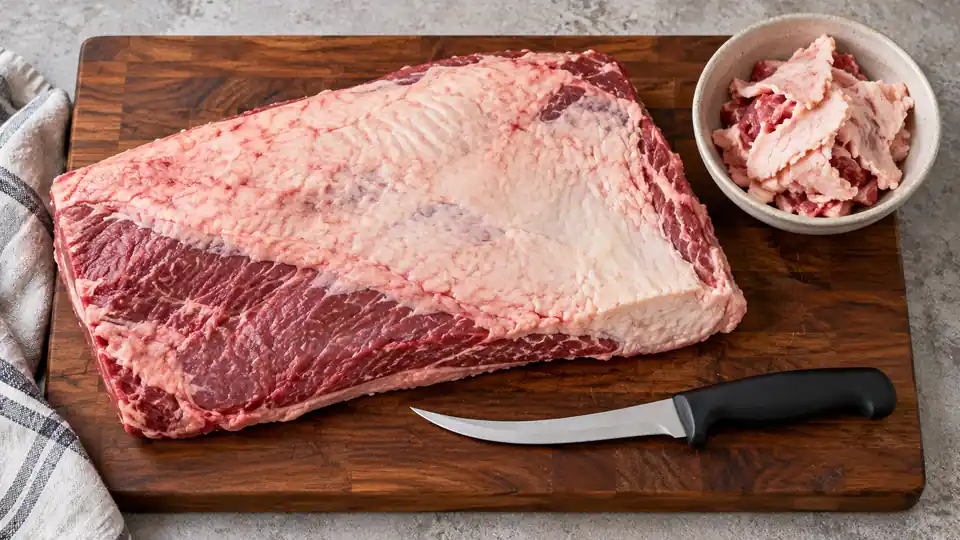
Trim a brisket while it is cold, using a sharp boning or trimming knife. Remove loose flaps, thin edges, surface membrane, and dense lumps of hard fat, then reduce the softer fat cap to a fairly even layer about 1/4 inch thick. Preserve the brisket’s main muscles and avoid digging deep grooves into the meat.
A whole packer brisket contains two overlapping muscles: the leaner, flatter flat and the thicker, fattier point. Trimming gives the brisket a smoother shape, helps seasoning reach exposed meat, and removes fat that is unlikely to render pleasantly during cooking.
A narrow trimming blade makes it easier to control shallow cuts around hard fat. Compare boning knives for brisket trimming if you need a tool for that work, then follow the preparation steps below.
Tools You Need
- A sharp boning or trimming knife: A narrow blade with a pointed tip provides control around seams and uneven contours. Moderate flexibility can help the blade follow the brisket’s surface.
- A large cutting board: It should hold the entire brisket without allowing either end to hang precariously over the counter.
- A damp kitchen towel or nonslip mat: Place it under the board to prevent movement.
- A tray or bowl: Use it to collect fat and meat trimmings.
- Paper towels: Patting the brisket dry makes it easier to hold securely.
A chef’s knife can handle broad, straight cuts, but its tall blade is less maneuverable around curved fat deposits. A short paring knife may work for small details, though it is inefficient for trimming a full packer brisket. Avoid serrated knives because they tend to tear the meat and make shallow, controlled cuts difficult.
If several meat-processing tasks recur, compare butcher-knife sets by their useful blade mix. A larger kit is optional, not a prerequisite for trimming one brisket.
For larger portioning jobs beyond fine fat removal, compare butcher knives by their intended preparation role; a wider blade is not automatically better for close trimming.
How to Trim a Whole Brisket
-
Keep the Brisket Cold
Refrigerate the brisket until you are ready to trim it. Cold fat is firmer, less slippery, and easier to slice cleanly than warm fat. If the brisket has warmed considerably during preparation, return it to the refrigerator briefly before continuing.
-
Set Up a Stable Work Area
Place a damp towel or nonslip mat beneath the cutting board. Clear nearby utensils and keep the knife handle free of grease. Pat the brisket dry with paper towels, then discard the towels and wash your hands.
-
Identify the Flat, Point, and Fat Cap
The flat forms the long, relatively thin portion of a whole brisket. The point is thicker and more rounded, overlapping one end of the flat. One side usually has a substantial fat cap, while the opposite side exposes more meat and connective tissue.
The internal seam of fat between the point and flat is part of the brisket’s structure. It does not need to be removed completely unless you plan to separate the two muscles.
-
Start on the Lean Side
Place the brisket with the fat cap facing down. Remove loose pieces of fat, ragged tissue, and thin surface membrane from the lean side. Slip the knife tip beneath a membrane, angle the edge slightly upward toward the material being removed, and use short strokes.
Keep the blade nearly parallel to the meat. If red meat remains attached to the discarded strip, adjust the blade closer to the membrane on the next cut. Small patches of thin connective tissue are less troublesome than deep gouges caused by aggressive trimming.
-
Remove Large Deposits of Hard Fat
Whole briskets often have firm, waxy fat near the point and along the seam between the two muscles. This dense fat renders less readily than softer surface fat. Remove thick protruding lumps gradually rather than trying to extract each deposit in one cut.
Use the fingertips of your free hand to lift the fat from a safe distance behind the blade. Slice away from that hand. Stop before cutting deeply into the point or opening the seam so far that the muscles begin to separate.
-
Square Off Thin and Ragged Edges
Trim narrow flaps and very thin corners that are likely to dry out or burn before the thick center becomes tender. Shape the flat into a smooth outline while preserving as much usable thickness as possible.
A large section of thin flat meat may still cook well, so avoid removing it solely to create a perfectly rectangular brisket. Focus on wispy edges, torn pieces, and abrupt projections that interfere with even cooking.
-
Turn the Brisket Fat-Side Up
Flip the brisket and inspect the fat cap. Look for high spots, thick ridges, and edges where the fat wraps around the sides. A common target is a layer about 1/4 inch thick, but the ideal amount depends on the brisket and cooking method.
-
Trim the Fat Cap in Shallow Passes
Hold the knife almost parallel to the brisket and shave off thin layers. Work across one small area at a time. Fat thickness varies, so check frequently by pressing gently and observing where red meat begins to show through.
A perfectly uniform layer is rarely possible. Leaving slightly more fat is usually preferable to exposing large areas of the flat through deep cuts. Some bare spots may already be present from processing and do not require further trimming.
-
Round Abrupt Corners
Round off sharp corners and remove any remaining dangling pieces. A smooth profile reduces exposed edges that can become overly dry. The finished brisket should have a compact shape without being carved down excessively.
-
Inspect Both Sides
Run your eyes across the surface for hard fat knobs, loose flaps, deep knife marks, or sections of fat that remain much thicker than the surrounding cap. Make small corrections, then stop. Excessive trimming reduces yield and can leave the flat with too little protection during a long cook.
How to Hold the Knife Safely
Grip the handle securely and keep your wrist neutral. Use controlled, shallow slicing strokes rather than forceful chopping motions. The blade should travel away from your free hand and body whenever the cut allows.
Fat can make both the handle and cutting board slippery. Pause to wash and dry your hands if your grip becomes greasy. Wipe the knife handle with a clean paper towel as needed, taking care to keep your fingers away from the cutting edge.
Do not catch a falling knife. Step back and let it fall. After trimming, place the knife where it cannot be hidden beneath the brisket, paper towels, or trimmings.
How Much Fat Should Remain?
About 1/4 inch of soft fat over the broad fat-cap side is a practical target for many cooking methods. This is a visual guideline rather than a precise requirement. Briskets have irregular contours, and measuring every section is unnecessary.
Different heat sources and cooking setups can change how much surface fat is useful. A heavily protected brisket may tolerate a little more, while very thick fat can block seasoning from the meat and remain unpleasantly dense after cooking. Bare meat is acceptable in isolated areas, but stripping the entire flat clean can increase drying at the surface.
Should You Separate the Point and Flat?
A whole packer brisket can be cooked intact, and trimming does not require separating its two muscles. Keeping them together is common for long smoking and roasting methods.
A separate breaking-knife comparison covers the larger curved profiles used for portioning work, rather than treating them as replacements for every narrow trimming cut.
Separation can make sense when the muscles will be cooked differently, when the point will be cubed for a second preparation, or when cooker space is limited. It also exposes more surface for seasoning. The trade-off is that each piece has more exposed area and may finish at a different time.
To separate them, follow the visible fat seam with shallow strokes while gently pulling the muscles apart. Do not cut straight through the meat based on an assumed seam location. The overlap and seam shape vary among briskets.
Common Trimming Problems
Cutting Deep Divots Into the Flat
This usually happens when the knife points down into the meat or when too much fat is removed in one pass. Keep the blade flatter and shave small amounts. A shallow divot can be left alone. Trying to level the entire brisket to match it removes more meat.
Removing All Surface Fat
The fat cap does not need to disappear. Reduce thick sections while leaving a moderate, relatively even covering. Surface fat and internal marbling are separate. Trimming the cap does not remove fat dispersed inside the muscle.
Leaving Thick, Hard Fat Between the Muscles
A bulky wedge of dense fat may remain firm after cooking. Reduce accessible portions, especially where a large lump protrudes from the surface. Avoid chasing the entire seam deep into the brisket unless muscle separation is planned.
Trimming a Warm Brisket
Warm fat bends, smears, and slips away from the blade. Cooling the brisket firms the fat and improves control. Keep total time at room temperature limited and refrigerate the meat promptly if cooking will not begin soon.
Using a Dull Knife
A dull edge requires more pressure and may skid across firm fat. Sharpen the knife before beginning if it crushes or tears rather than slicing cleanly. Honing can maintain an edge in suitable cases, but it cannot restore every dull or damaged blade.
What to Do With Brisket Trimmings
Sort the trimmings into clean meat and fat as you work. Substantial pieces of meat can be cooked separately, ground with appropriate food-safety practices, or saved for another recipe. Fat can be rendered into beef tallow.
Discard membrane, discolored scraps, contaminated pieces, and very small ragged bits. Keep any trimmings intended for food cold, and refrigerate or freeze them promptly in clean containers.
Cleanup and Raw-Meat Safety
Do not rinse raw brisket. Splashing water can spread raw-meat juices around the sink and nearby surfaces. After trimming, wash the knife, cutting board, counter, and any utensils that contacted the raw beef with hot, soapy water. Follow the cleaning and sanitizing instructions appropriate for the cutting-board material.
Wash your hands thoroughly after handling the brisket and before touching seasoning containers, cabinet handles, phones, or cooked food. Keep raw brisket and its juices separate from ready-to-eat ingredients.
Dry the knife promptly after washing. Store it in a block, sheath, drawer insert, or other holder that protects the edge and prevents accidental contact.
Before You Season the Brisket
Pat the trimmed brisket dry and check for loose fragments that could burn during cooking. The brisket should have a smooth outline, a reduced layer of soft fat, and no large protrusions of dense fat. Season immediately or return it to the refrigerator in a covered food-safe container.
For serving after cooking, use the slicing-versus-carving explanation rather than carrying the trimming technique over unchanged.
Successful brisket trimming is controlled rather than aggressive. Keep the meat cold, use a sharp narrow knife, remove hard and irregular material in shallow passes, and preserve the flat’s thickness. The goal is an evenly shaped brisket that can cook predictably without sacrificing useful meat.
